> ## Documentation Index
> Fetch the complete documentation index at: https://docs.jaksam-scripts.com/llms.txt
> Use this file to discover all available pages before exploring further.
# Context Actions
> Eigene Rechtsklick-Buttons zu Items hinzufügen, entweder einzeln oder nach Item-Typ
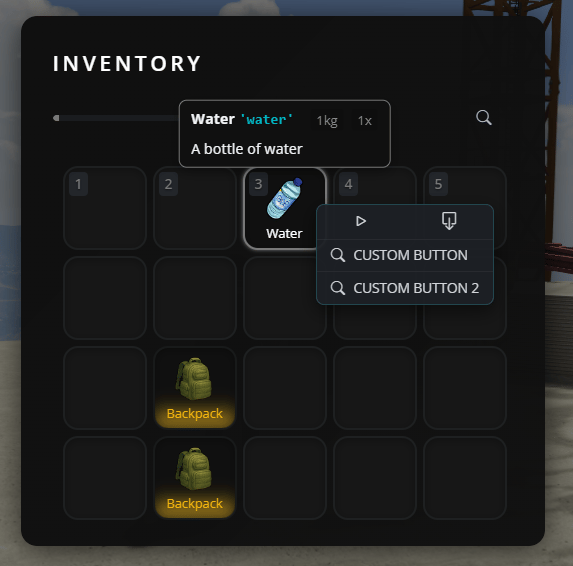
Context Actions sind eigene Buttons, die erscheinen, wenn du mit Rechtsklick auf ein Item in deinem Inventar klickst. Damit können Spieler bestimmte Aktionen mit Items ausführen, wie Benutzen, Untersuchen oder jedes beliebige eigene Verhalten.
 ## Wann welche Methode nutzen
Nutzen, wenn du Buttons für EIN bestimmtes Item willst (z.B. nur beim "water"-Item)
Nutzen, wenn du die gleichen Buttons bei ALLEN Items des gleichen Typs willst (z.B. alle Waffen, alle Behälter)
## Methode 1: Buttons zu einem einzelnen Item hinzufügen
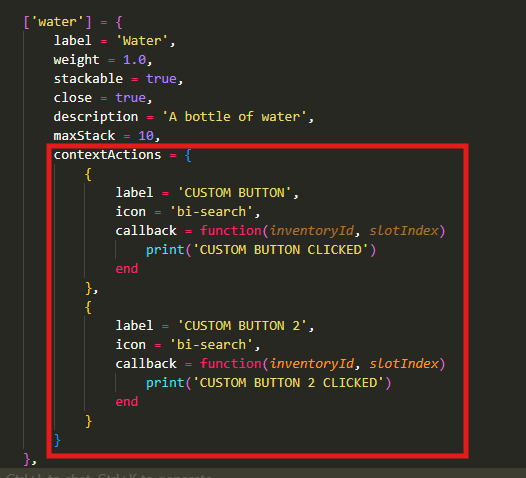
Um eigene Buttons zu einem bestimmten Item hinzuzufügen, öffne `jaksam_inventory/_data/items.lua` und finde oder erstelle dein Item. Füge die `contextActions`-Eigenschaft hinzu:
```lua theme={null}
['water'] = {
label = 'Water',
weight = 1.0,
stackable = true,
close = true,
description = 'A bottle of water',
maxStack = 10,
contextActions = {
{
label = 'Drink', -- Button-Text, den Spieler sehen
icon = 'bi-droplet', -- Icon (Bootstrap Icons)
callback = function(inventoryId, slotIndex)
-- Dein Code hier, läuft wenn der Button geklickt wird
TriggerServerEvent('myserver:drinkWater', inventoryId, slotIndex)
end
},
{
label = 'Check expiration',
icon = 'bi-calendar-check',
callback = function(inventoryId, slotIndex)
print('Checking expiration date...')
-- Füge hier deine Logik hinzu
end
}
}
},
```
**Wichtige Hinweise:**
* `inventoryId`: Gibt an, in welchem Inventar sich das Item befindet (Spieler-Inventar, Kofferraum, usw.)
* `slotIndex`: Die Slot-Nummer, in der sich das Item befindet
* `icon`: Nutze Bootstrap Icons (suche online nach "bootstrap icons" für Icon-Namen)
## Methode 2: Buttons zu allen Items eines bestimmten Typs hinzufügen
Falls du die gleichen Buttons bei ALLEN Items des gleichen Typs willst (wie alle Waffen, alle Lebensmittel usw.), nutze das Defaults-System.
Öffne `jaksam_inventory/_data/defaults.lua` und füge den gewünschten Typ hinzu oder bearbeite ihn:
```lua theme={null}
Script.defaultsByType = {
['weapon'] = {
displayFields = {
-- ... bestehende display fields ...
},
contextActions = {
{
label = 'Empty ammo',
icon = 'bi-asterisk',
callback = function(inventoryId, slotIndex)
TriggerServerEvent(Utils.eventsPrefix .. ":emptyAmmo", inventoryId, slotIndex)
end
},
{
label = 'View components',
icon = 'bi-eye',
callback = function(inventoryId, slotIndex)
Script.closeInventoryUI()
Script.viewComponents(inventoryId, slotIndex)
end
}
}
},
['food'] = {
contextActions = {
{
label = 'Eat',
icon = 'bi-egg-fried',
callback = function(inventoryId, slotIndex)
TriggerServerEvent('myserver:eatFood', inventoryId, slotIndex)
end
}
}
},
}
```
Das bedeutet:
* ALLE Items mit `type = 'weapon'` haben die Buttons "Empty ammo" und "View components"
* ALLE Items mit `type = 'food'` haben einen "Eat"-Button
## Globale Buttons zu ALLEN Items hinzufügen
Du kannst auch Buttons hinzufügen, die bei JEDEM Item im Spiel erscheinen, über den speziellen `['*']`-Key:
```lua theme={null}
Script.defaultsByType = {
['*'] = {
contextActions = {
{
label = 'Inspect',
icon = 'bi-search',
callback = function(inventoryId, slotIndex)
print('Inspecting item...')
-- Dein Code hier
end
}
}
},
}
```
## Related topics
- [Action Buttons](/de/jaksam-inventory/guides/action-buttons.md)
- [Actions](/de/jobs-creator/client/actions/index.md)
- [Actions in externen Menüs](/de/jobs-creator/client/actions/using-the-actions-in-a-radial-external-menu.md)
- [Actions-Menü öffnen](/de/jobs-creator/client/actions/open-actions-menu.md)
- [Search/Steal Action](/de/jobs-creator/server/search-steal-action/index.md)
## Wann welche Methode nutzen
Nutzen, wenn du Buttons für EIN bestimmtes Item willst (z.B. nur beim "water"-Item)
Nutzen, wenn du die gleichen Buttons bei ALLEN Items des gleichen Typs willst (z.B. alle Waffen, alle Behälter)
## Methode 1: Buttons zu einem einzelnen Item hinzufügen
Um eigene Buttons zu einem bestimmten Item hinzuzufügen, öffne `jaksam_inventory/_data/items.lua` und finde oder erstelle dein Item. Füge die `contextActions`-Eigenschaft hinzu:
```lua theme={null}
['water'] = {
label = 'Water',
weight = 1.0,
stackable = true,
close = true,
description = 'A bottle of water',
maxStack = 10,
contextActions = {
{
label = 'Drink', -- Button-Text, den Spieler sehen
icon = 'bi-droplet', -- Icon (Bootstrap Icons)
callback = function(inventoryId, slotIndex)
-- Dein Code hier, läuft wenn der Button geklickt wird
TriggerServerEvent('myserver:drinkWater', inventoryId, slotIndex)
end
},
{
label = 'Check expiration',
icon = 'bi-calendar-check',
callback = function(inventoryId, slotIndex)
print('Checking expiration date...')
-- Füge hier deine Logik hinzu
end
}
}
},
```
**Wichtige Hinweise:**
* `inventoryId`: Gibt an, in welchem Inventar sich das Item befindet (Spieler-Inventar, Kofferraum, usw.)
* `slotIndex`: Die Slot-Nummer, in der sich das Item befindet
* `icon`: Nutze Bootstrap Icons (suche online nach "bootstrap icons" für Icon-Namen)
## Methode 2: Buttons zu allen Items eines bestimmten Typs hinzufügen
Falls du die gleichen Buttons bei ALLEN Items des gleichen Typs willst (wie alle Waffen, alle Lebensmittel usw.), nutze das Defaults-System.
Öffne `jaksam_inventory/_data/defaults.lua` und füge den gewünschten Typ hinzu oder bearbeite ihn:
```lua theme={null}
Script.defaultsByType = {
['weapon'] = {
displayFields = {
-- ... bestehende display fields ...
},
contextActions = {
{
label = 'Empty ammo',
icon = 'bi-asterisk',
callback = function(inventoryId, slotIndex)
TriggerServerEvent(Utils.eventsPrefix .. ":emptyAmmo", inventoryId, slotIndex)
end
},
{
label = 'View components',
icon = 'bi-eye',
callback = function(inventoryId, slotIndex)
Script.closeInventoryUI()
Script.viewComponents(inventoryId, slotIndex)
end
}
}
},
['food'] = {
contextActions = {
{
label = 'Eat',
icon = 'bi-egg-fried',
callback = function(inventoryId, slotIndex)
TriggerServerEvent('myserver:eatFood', inventoryId, slotIndex)
end
}
}
},
}
```
Das bedeutet:
* ALLE Items mit `type = 'weapon'` haben die Buttons "Empty ammo" und "View components"
* ALLE Items mit `type = 'food'` haben einen "Eat"-Button
## Globale Buttons zu ALLEN Items hinzufügen
Du kannst auch Buttons hinzufügen, die bei JEDEM Item im Spiel erscheinen, über den speziellen `['*']`-Key:
```lua theme={null}
Script.defaultsByType = {
['*'] = {
contextActions = {
{
label = 'Inspect',
icon = 'bi-search',
callback = function(inventoryId, slotIndex)
print('Inspecting item...')
-- Dein Code hier
end
}
}
},
}
```
## Related topics
- [Action Buttons](/de/jaksam-inventory/guides/action-buttons.md)
- [Actions](/de/jobs-creator/client/actions/index.md)
- [Actions in externen Menüs](/de/jobs-creator/client/actions/using-the-actions-in-a-radial-external-menu.md)
- [Actions-Menü öffnen](/de/jobs-creator/client/actions/open-actions-menu.md)
- [Search/Steal Action](/de/jobs-creator/server/search-steal-action/index.md)